|
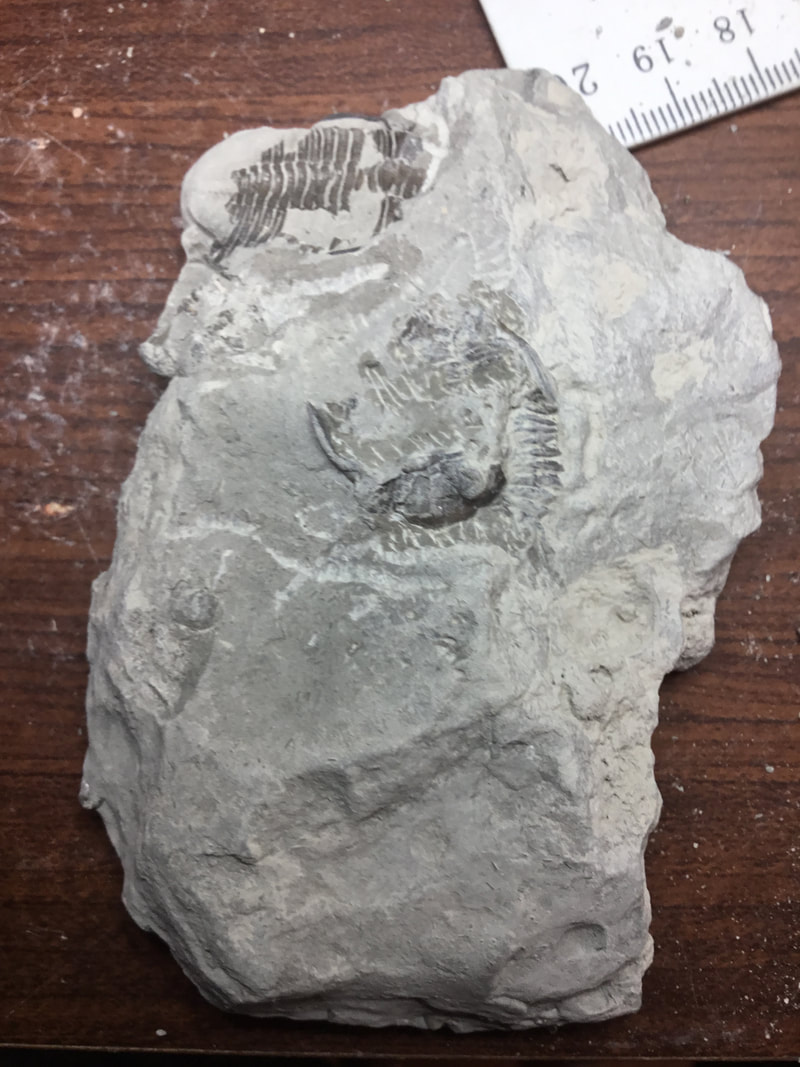
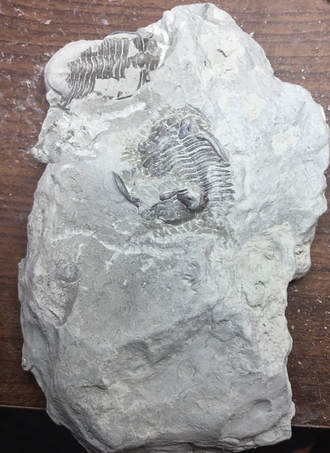
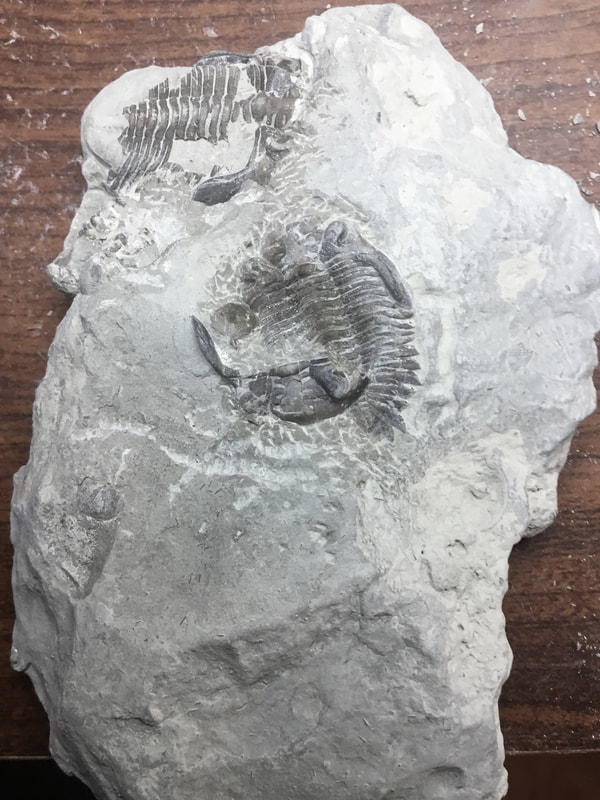
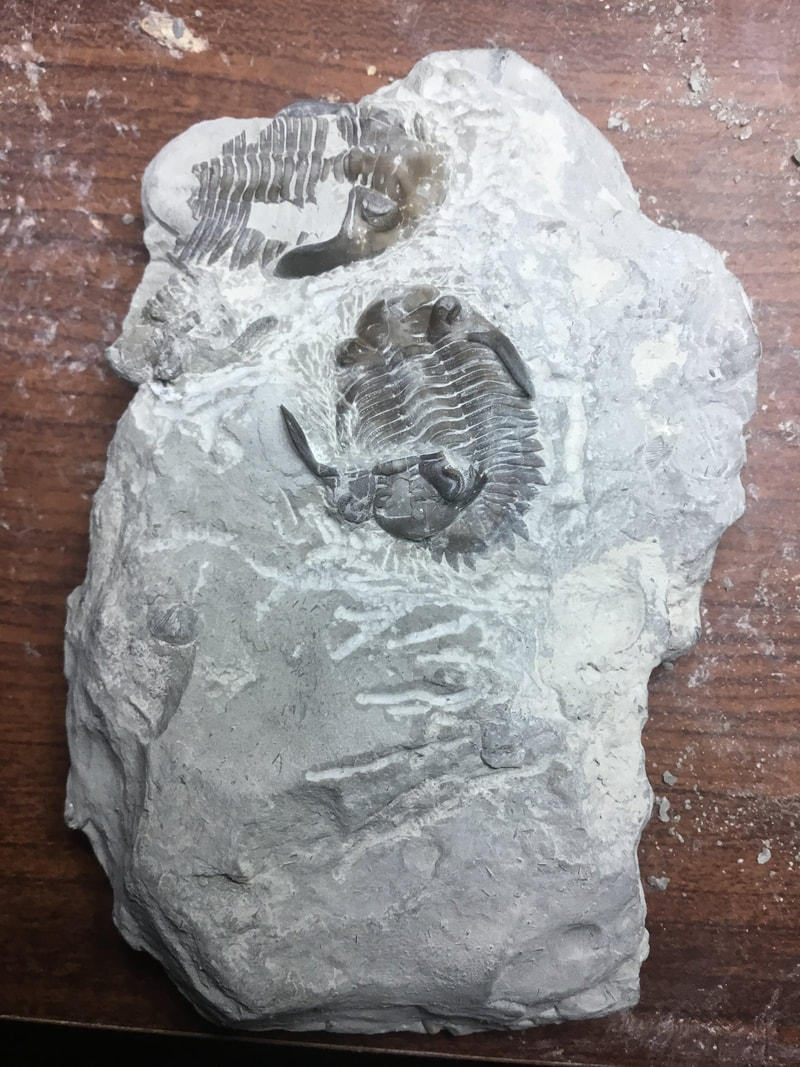
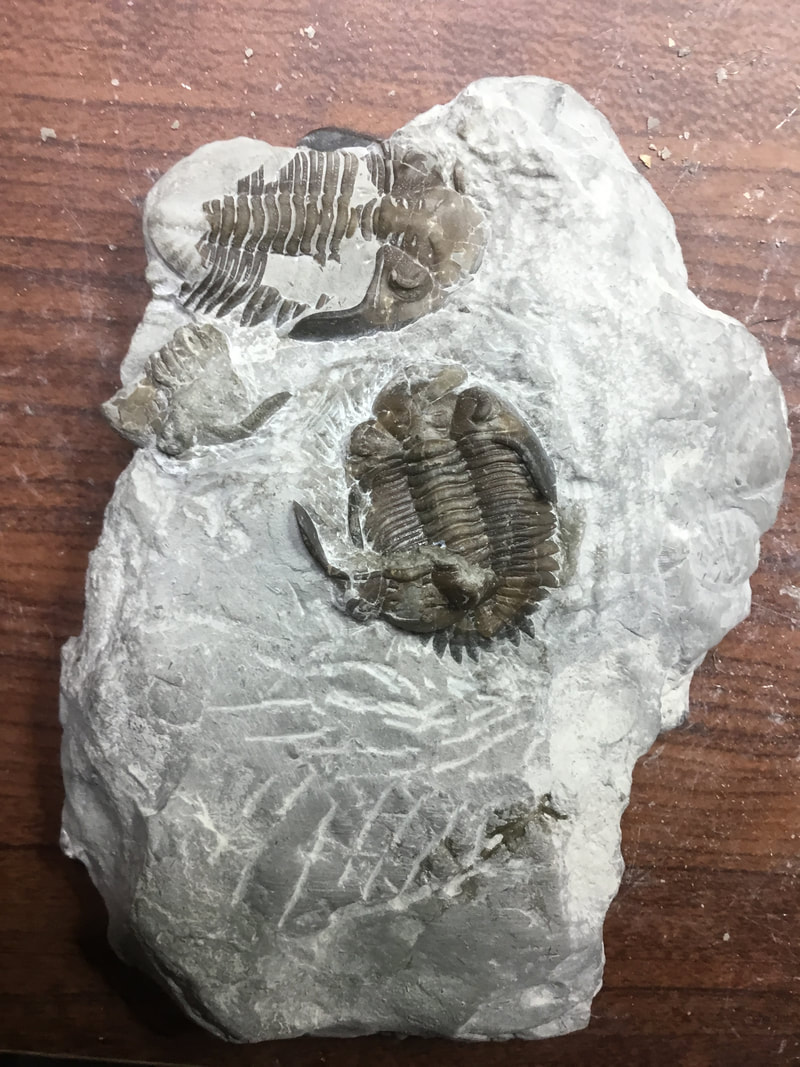
A very brief reprieve from the biting cold has meant a small thaw. I did do some poking around at my nearby honey hole, but didn't come away with anything worth showing. So, instead, I've been fiddling with my own fossils at home and exploring the productive postal formation. Let's have a look at prep fun first... 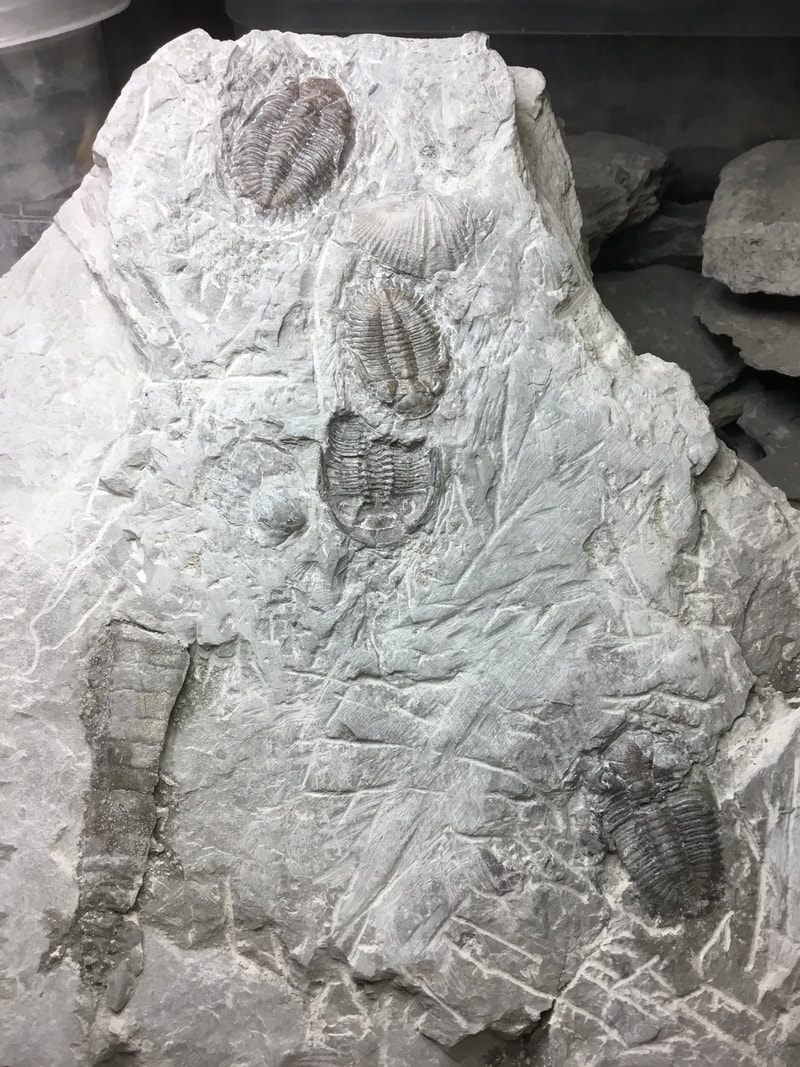 Readers of this blog may recall this slab that has undergone a bit of transformation since I found it back in October. Initially, there were two in the slab, and then I found a third one. Well, I probed some more and this rock keeps on giving. 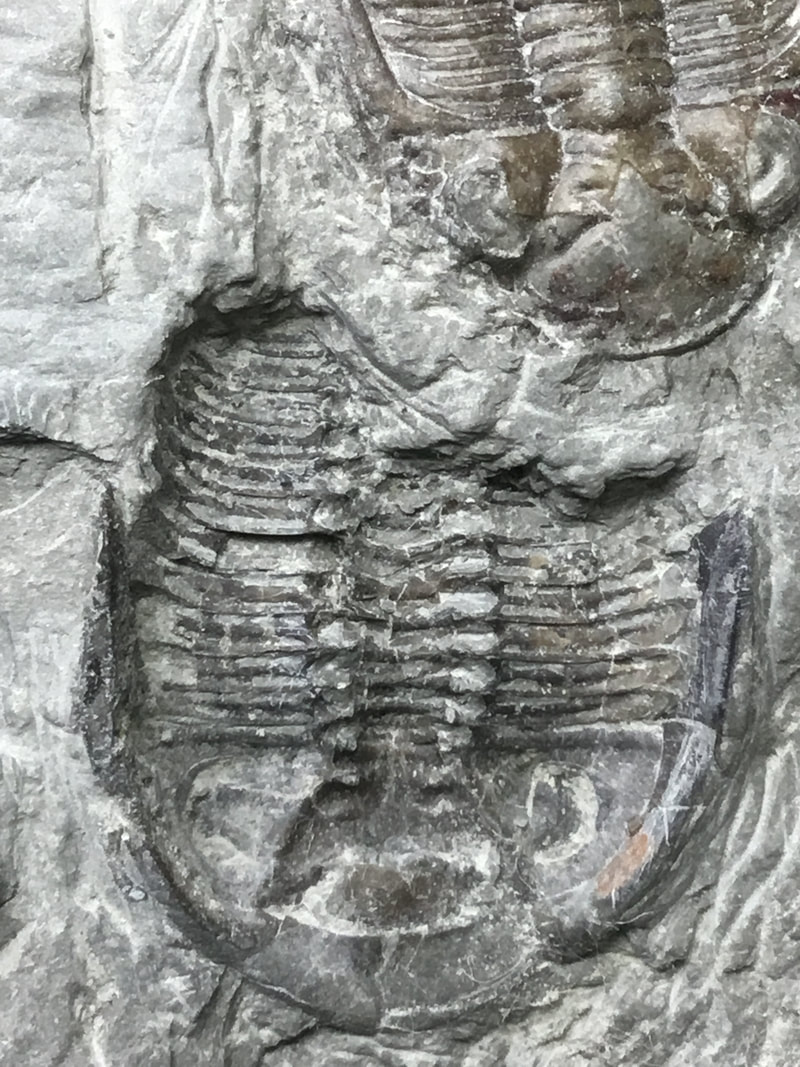 So what's new? This close-up image tells the story. This is not an impression, but a ventral (underneath) side Greenops. Keep in mind that these guys are very delicate and have a tendency to flake easily even if you breathe too hard on them! This was a nerve-wracking experience as I've never prepped from the ventral side before. I suspect it is complete, but it is uncomfortably too close to a full specimen on top that is not laying directly on top, but that there is a few millimetres of matrix separating the two. If I go too close on the ventral bug, it may shatter the top one. Of course, I can shave it a bit closer, which is what I plan to do when I get the nerve!  Speaking of prep that can make one nervous, this is my new acquisition from the postal formation, courtesy of a trilobitologist in the UK. This is from Mt. Isshamour. Morocco, a Ceratarges sp. nov. from the middle Devonian. It is my second lichid trilobite. Although the pygidium is disarticulated from the main body, it does have those very nice "horns" that at the moment look like mouse ears until I can prep the matrix off (carefully!). The genal and pygidial spines are quite impressive, and it is likely these were developed as a form of protection against predation.
I am waiting on no fewer than four (and possibly more) packages from the postal formation in the next while, which will have to sustain my trilobite fever until winter ends and the collecting season kicks off in earnest. With the snow covering much of the northerly reaches, and cold weather keeping the intrepid fossil collectors indoors, the off-season is a perfect time to catch up on fossil preparation, organizing finds, planning the trips for the upcoming season, and adding or replacing tools for the field and prep station.
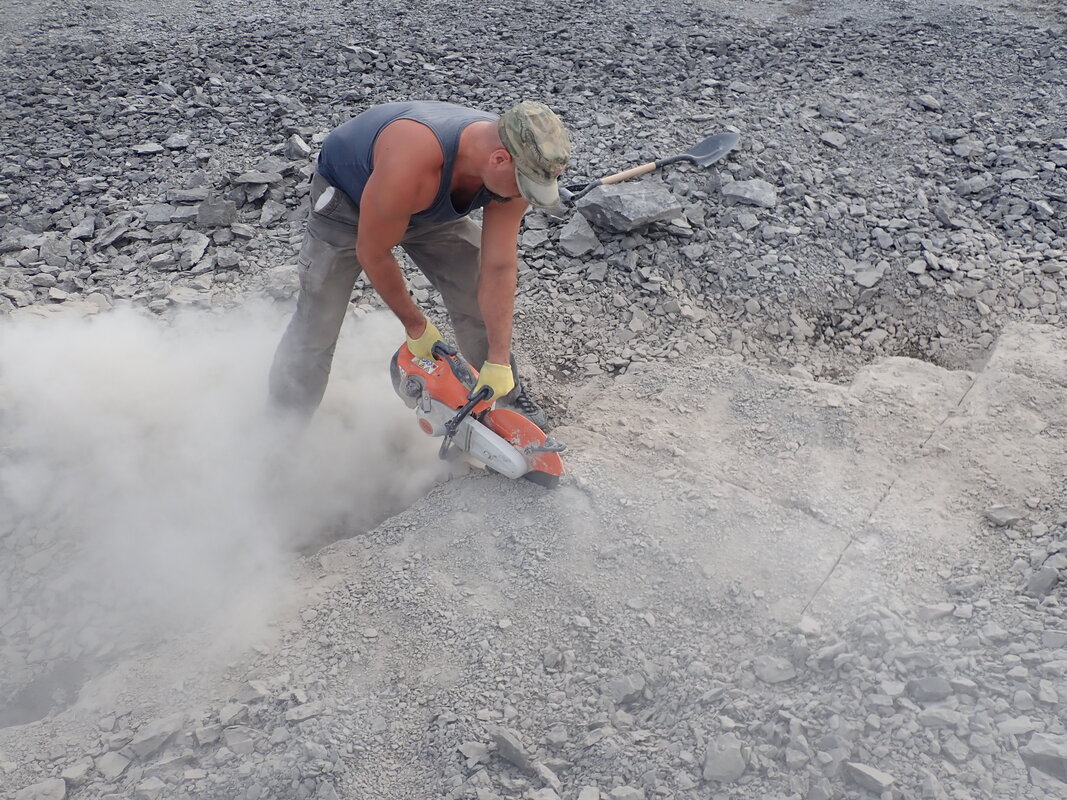
But it is also an ideal time to train the body for the rigours of collecting! There is no doubt that, sometimes, collecting can take a physical toll on the body. Many of us put ourselves through a punishing regimen - be it the long hikes over and through tough terrain like deep woods, uneven rocky surfaces, and sticky mud to get to our favoured collecting spots while carrying a heavy collecting kit + tools; balancing for long hours on slopes which is hard on the hips, knees, ankles, and back; several hours of repetitive hammer blows that can make the hand, wrist, and shoulder sore; long periods in unnatural positions crouched among the rocks or bent over putting strain on the joints and lower back; and, of course, the sometimes long trek back, loaded with a lot of rock! As we get older, our bodies are far less cooperative with our plans. When we are focused on the hunt, we sometimes hit the physical limit of what a body can do. Yes, the mind is willing, but the flesh is weak. The residual soreness of aches and pains after a day in the field are certainly felt the next day! In this post I am going to talk about improving fitness for the field. As a caveat, this is what works for me given where and how I collect. For those who dive in the rivers for fossils, or engage more casual surface collecting, other exercises would apply. But, for me, I spend a lot of time prying out slabs of rock, wrestling them into position, and swinging hammers. Exercise is what permits me to break more and bigger rock faster, carry more back, and remain out in the field for much longer. The exercises recommended here involve isolation techniques that are indexed to the specific motions performed in the field. These include pushing, pulling, lifting, and striking. Pushing Function: Pushing actions in the field usually involve using pry bars, which may also involve pulling to create a rocking motion to loosen tightly compacted layers of rock. Muscle Groups: Pushing activates a range of muscles: the chest, triceps, and anterior deltoid (front of shoulder). The goal of pushing-focused exercises is to increase strength and stamina for when pushing motions are required in the field. Exercises:
Pulling Function: Pulling actions in the field involve using pry bars, but also flipping/stabilizing larger slabs, and carrying larger loads. Muscle Groups: Pulling activates a range of muscles: the upper back, posterior deltoid (back of shoulder), and biceps. Exercises:
Lifting Function: Being able to lift your gear to and from the site, and manipulate slabs, requires the ability to lift - but to do so safely. Muscle groups: Pending the type of lift, it may engage the shoulders, back (upper and lower), biceps, and legs. Exercises:
Striking Function: Delivering effective hammer blows requires a mix of force, good motor control, and stamina. At times, you will need to deliver an intensive, devastating blow to a large, dense rock; at other times, it is a series of lighter, consistent taps to split along a layer or concretion. You may also be having to drive wedges deep into layers, and this requires fine control plus force wielding a sledge hammer. Striking is the convergence of all the other motions of pushing, pulling, and lifting. Muscle Groups: Biceps, triceps, shoulders (all three of the deltoid group), upper back, forearm. Exercises: just about all of them listed above! The one difference would be these that focus on shoulder and forearm:
Other Tips Stretching: Whether you are hitting the gym or about to engage in a whole day of intensive fossil collecting, stretching is one of the most important but overlooked pre-activities. By stretching, you minimize your chance of injury. Torn muscle, ligaments, and tendons from not stretching will simply sideline you from getting out in the field. Balance Power and Stamina: Force is as important as endurance if you’re going to be spending the day (or several consecutive days!) out breaking rock. Go for a balance between explosive power to take on the bigger rocky challenges, and be able to keep up the momentum in pacing yourself throughout the day to get through a higher quantity of rock. Eat Right: More exercise and activity means your body will need to access more good nutrition to provide energy, and to assist in recovery. You can hop online and read a million different kinds of diet, ranging from the mundane to the miraculous, from the feasible to the fantastical when it comes to claims. But there is no magic diet for all people. Keep it simple and reasonable, really: a little more protein, less salt and sugar, deep green vegetables, and stay relatively consistent. Consuming beer, bacon, chips, and chocolate bars exclusively is probably not going to create the winning conditions for an efficient, energetic, fossil-hunting body you can rely on in the field. Show Don’t Tell, Deeds Not Words The following is my own weekly regimen. It is tailored for my needs, according to my abilities and overall goals. I provide it here as an example, not as a prescriptive template: Day 1: Biceps/back * 3 sets, 20 reps bicep curls @ 30 lbs (warmup)
Day 2: Chest/Triceps
Day 3: Partial rest day
Day 4: Biceps/shoulders * 3 sets, 20 reps bicep curls @ 30 lbs (warmup)
Day 5: Miscellaneous
Day 6: Touchup
Day 7: Recovery * Light activity, walking, etc. Mostly a day to recover and daydream about fossil collecting trips. This regimen has changed frequently in the last 3 years. I've added things in, and taken some away. Even the way the muscles are targeted change over time. If you are considering doing something like this long term, it is important to change it up every few months as the body simply gets used to regimen and will enter into maintenance rather than development mode. In a sense, you have to shock your body to get better! Last I checked, it's still winter, and that means no possibility of getting out to collect. However, needs must when the devil drives and all that, so I have been doing some collecting indoors. I am going to kick this post off with something very close to home (as in, at home!). 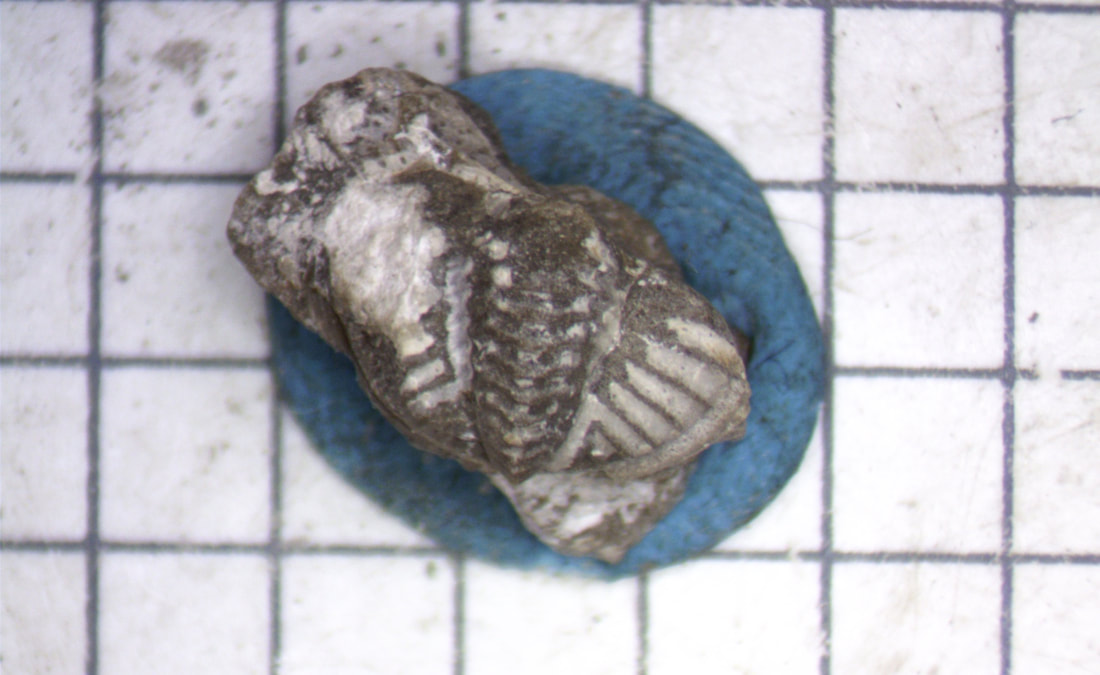 This pygidium was found among the many pieces I collected from my honey hole in town. When I first found it, I thought little of it and just threw it in the bag. However, now that the snows keep my troublemaking relegated to the indoors, I decided on a Sunday afternoon to look a bit closer at stuff I stuffed into containers from the previous year. This one is bereft of an identity at the moment. I've searched the literature, from Ludvigsen to Lesperance, to Levi-Setti to Whittington, and can't seem to get a proper ID on this lower Devonian trilobite. If anyone out there knows, I'd be grateful to hear from you in the comments. So, setting aside mysteries, I purchased a few trilobites - one from eBay and two from a fellow forum member. 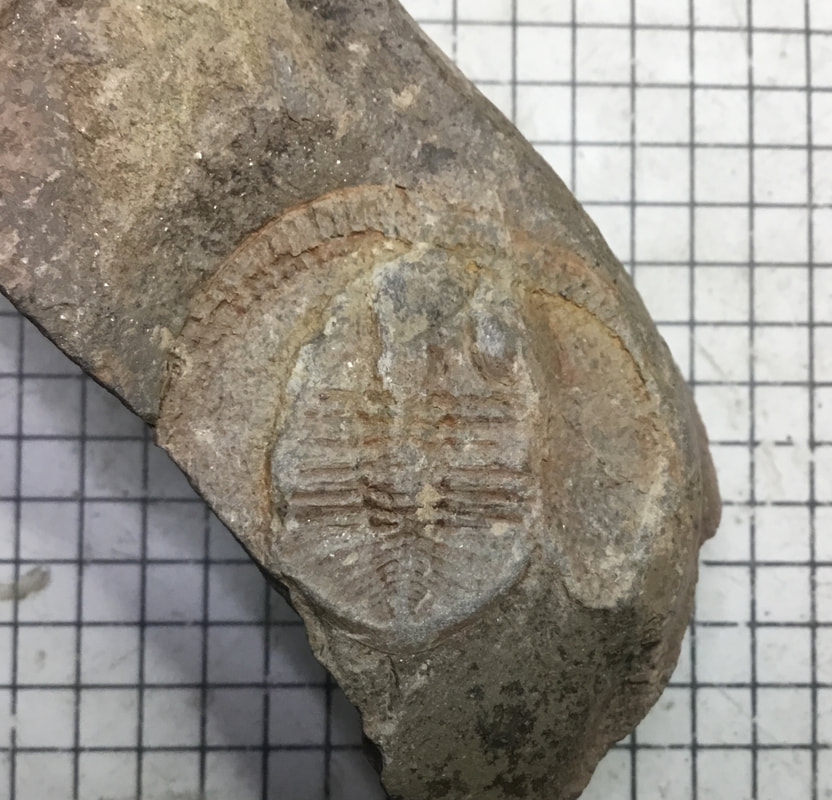 This is the eBay acquisition that I got very cheaply: a Declivolithus ?alfredi from Morocco. This is a neat looking asaphid trilobite from the Ordovician with a kind of textured "fan" that reminds me of harpetid bugs.  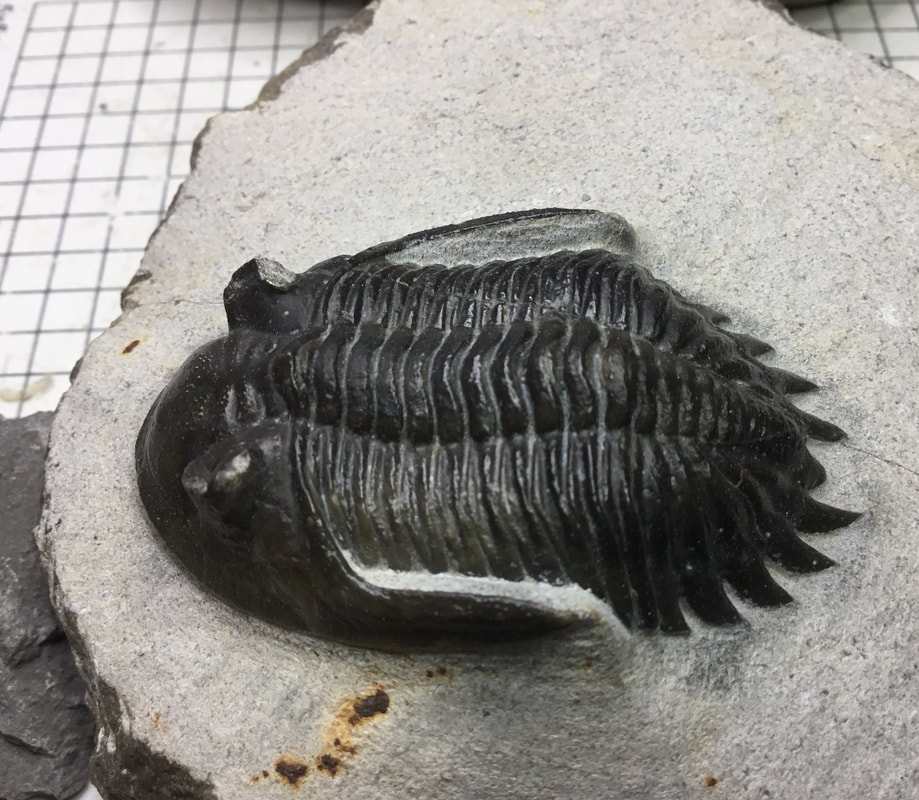 Adding another Moroccan trilobite to the collection (recalling I also have a Drotops megalomanicus acquired in July, 2017), this is an exquisitely well-preserved Hollardops sp. I got from a fellow forum member. The eye lenses show great detail, and I can tell it's genuine as opposed to the many fakes out there because of one very telling detail: notice the crack that travels across the specimen? The first picture shows it best. That is known as a discovery crack, and that is how these trilobites are found in Morocco. The matrix is ridiculously dense, so trilobites do not come out nice and clean. Instead, diggers will find a whisker line that shows the presence of a trilobite. From there, they glue the two pieces together and prep it out. This one looks very similar to Greenops, but this style for phacopids was quite popular in the Devonian! 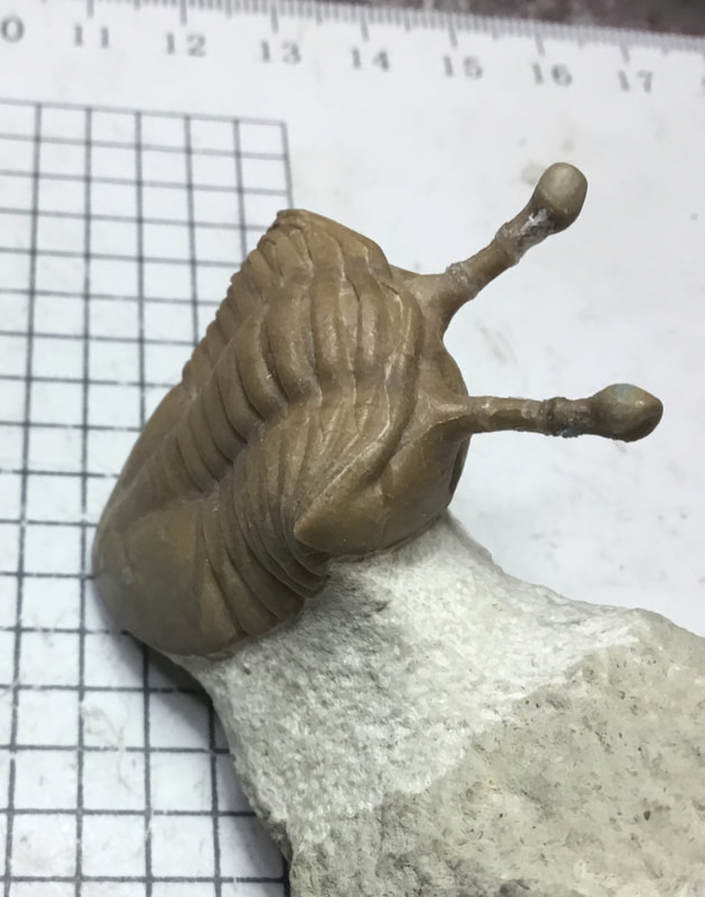 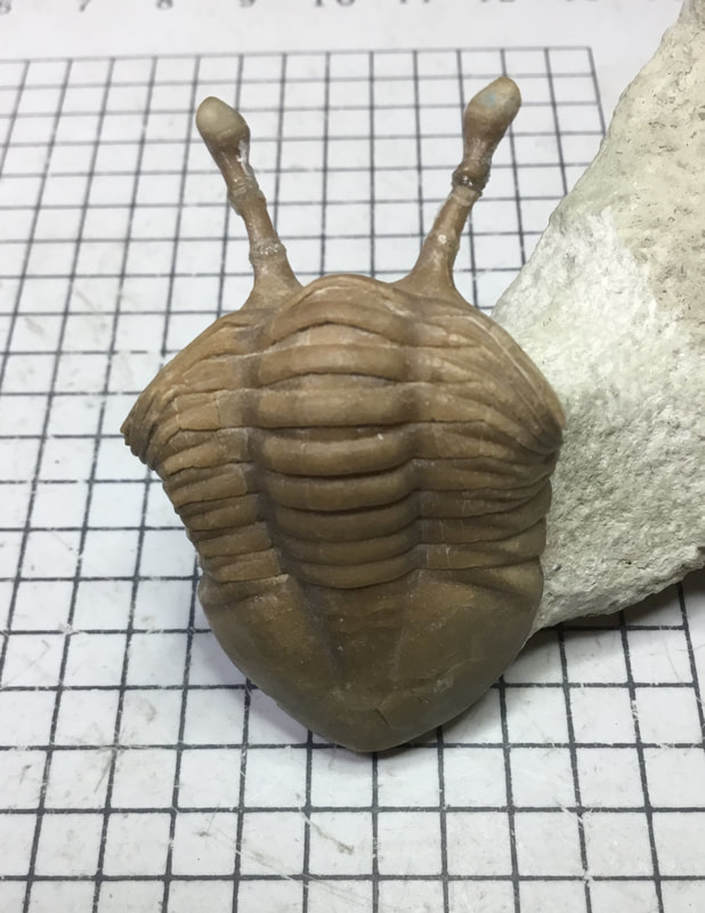 From Russia with love! Yes, this is an Ordovician trilobite from Russia, Asaphus kowalewskii. It is a commonly sought after specimen due to its long eye stalks, or peduncles. Sadly, despite all noble efforts from my friend on the forum, the postal service still managed to damage this one, so it took an hour of trying to reattach several pieces of the peduncles. They may not be in their proper orientation, but you haven't explored your full lexicon of expletives until you try to use crazy glue and tweezers to try and restore broken peduncles. Despite its current state, it still finds a home here.
These trilobites, for some reason, developed long eye stalks. It has been reasoned that it was to be able to see in highly turbid waters, or to be able to continue their benthic existence safely while being buried up to their eyes. What is particularly unique about them is that they are only found in Russia. And that isn't all. Yes, wait, there's more! - But that will have to wait until packages arrive. I have traded some spare trilobites with forum members in the Netherlands and South Korea who have some lovely bugs to send me in return. I also have another exotic Moroccan bug coming from England. I'll update this post or make a new one when they all come in. Apart from that, I did some online shopping for fossil necessities. Coming in the mail will be a pin vice, which will spare my poor hands and fingers in using sewing needles for fine prep. I'm also awaiting a tactical backpack to replace my rather worn backpack that is pretty much unusable now as a cat peed on it. But, so far, 2018 has seen the arrival of three new species to my collection, and one mystery unknown! I anticipate from between 4-8 new specimens in the next few months. Starting off the collecting year - in pre-season - strongly! I was fooling around with the new microscope, taking some unimportant pieces from trips past to practice a bit of sewing needle prep. Back in the summer I had crossed the river at Arkona to check out the south banks for the first time. It was underwhelming as it looked pretty picked over, and exposures were too dangerous to access. I had noticed a pile of Widder shale that someone had obviously placed there - mostly broken bits and other stuff that would be somewhat decent for a first time collector. I make similar conspicuous piles for others of stuff that doesn't meet my standards, or of fossils I already have too many of. 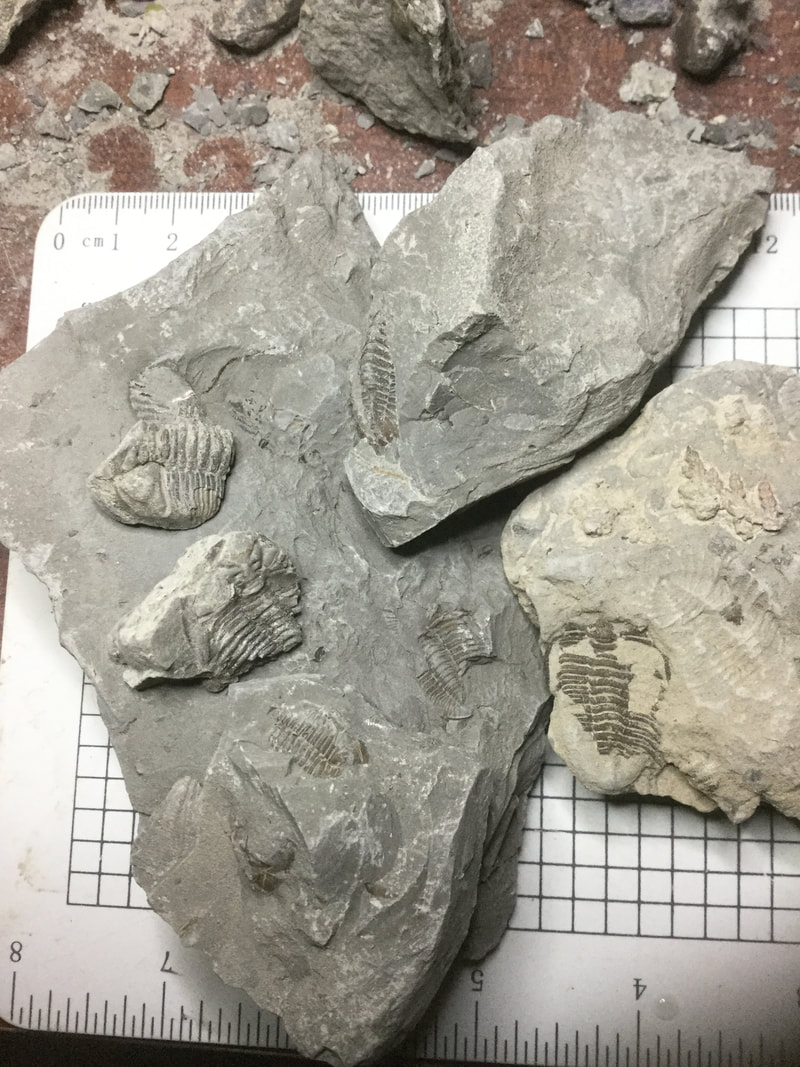 So the piece I was fiddling with is the light beige one on the far right, found on August 18th. You can see the impression of a full prone Greenops widderensis, as well as a busted up prone next to it - a classic piggy pile. Whoever got the other side probably felt pretty lucky. Although it was not a complete one, I put it in my collecting bucket anyway. My delightful discovery of a third Greenops on that slab I was working on back in late October (post here) taught me something: the rich yet very thin Greenops layer tends to have them in multiple assemblages. Fast forward to now. 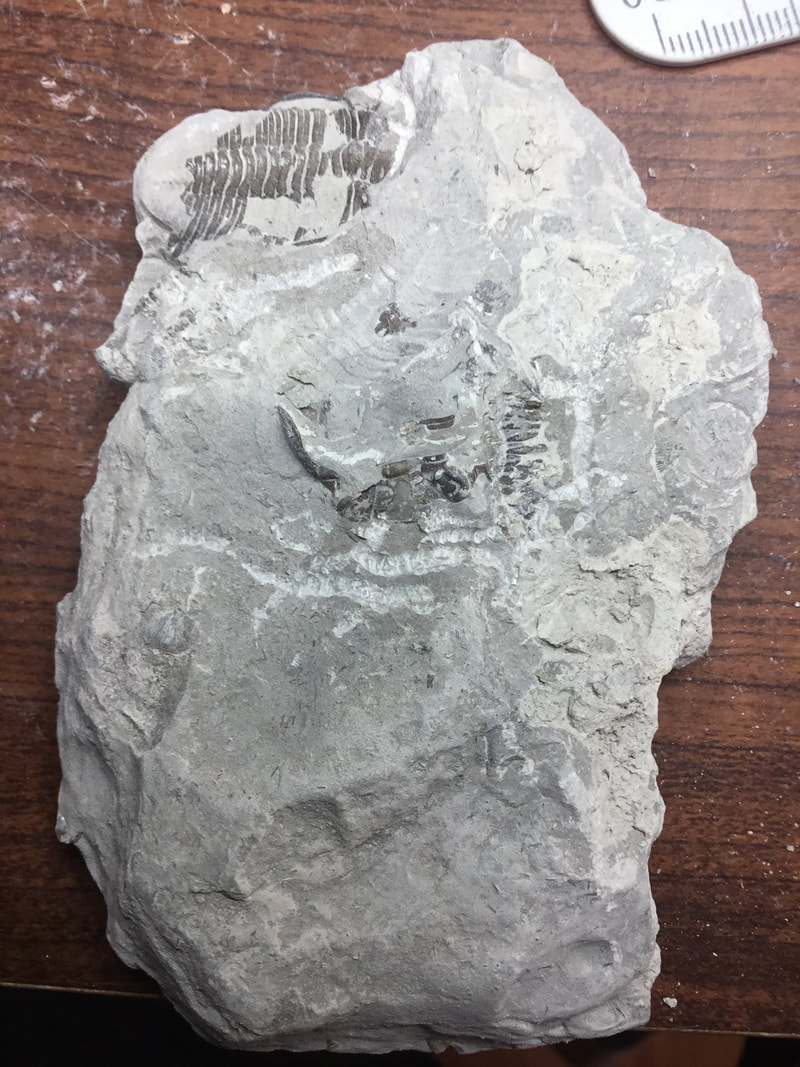 I figure why not take the chance to see if there are any more lurking under here? I think you know where this is going! I began chipping away at various spots and saw some thoracic segments sticking out beneath the broken cephalon in the centre.
Over two hours of using the sewing needle, I continued chipping away. Under serious magnification, it gave me a great deal more precision in removing matrix. Yeah, the impression had to be sacrificed, but for the good cause of a full prone trilobite! I decided to keep the broken cephalon on the top to make it an interesting association piece. I also uncovered more of the head of the top one, and discovered a pyritized partial below it. The next step was abrasion under serious magnification (where a single segment might take up my entire field of view), followed by some more sewing needle work.  Not too bad! It has a few problems (two right pygidial spike tips are broken, parts of it seem to be rolled underneath itself slightly, and the glabella got crushed during preservation), but I'm proud of this one. A last step may be to find a way of getting out the ugly tool marks.
This is a comparison of where I began, and where it ended up. 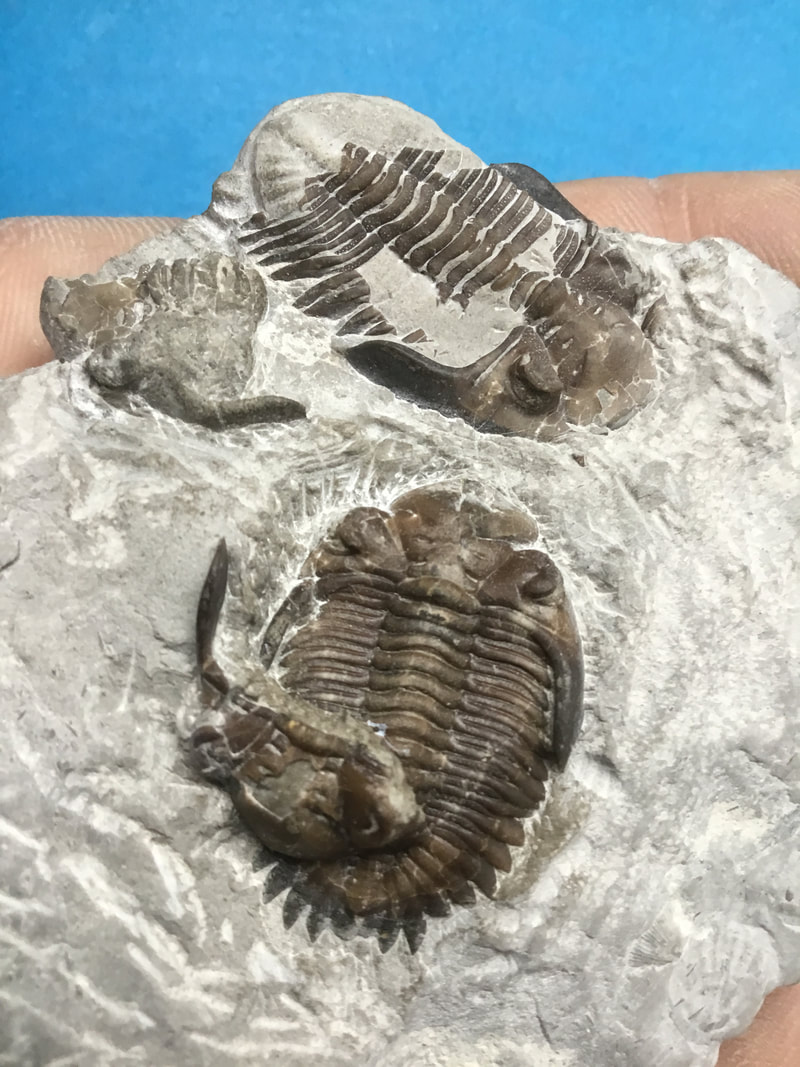 So, not as good as some of my more seasoned and experienced fossil preparators I know, but a good start where the right tools make a real difference. I still have some other Widder shale from previous trips that were disappointments showing a full impression and little else, so perhaps I ought to have a closer look. Or, as my fossil comrade Malcolm says, I should go out and buy a lottery ticket. 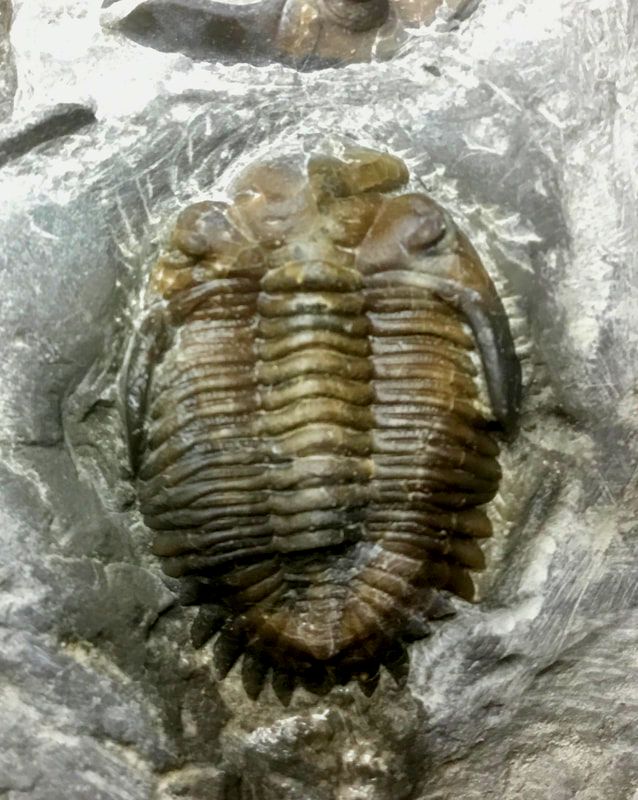 Until the big, thick, white blanket of winter is yanked off, it looks like my adventures will be confined to what I can do indoors. Over the past year I've been gradually adding more fossil preparation gear, and although there are a few more items left on the list, it is coming along nicely. Let's start off with a before and after picture of the space that I finally got around to clearing up: 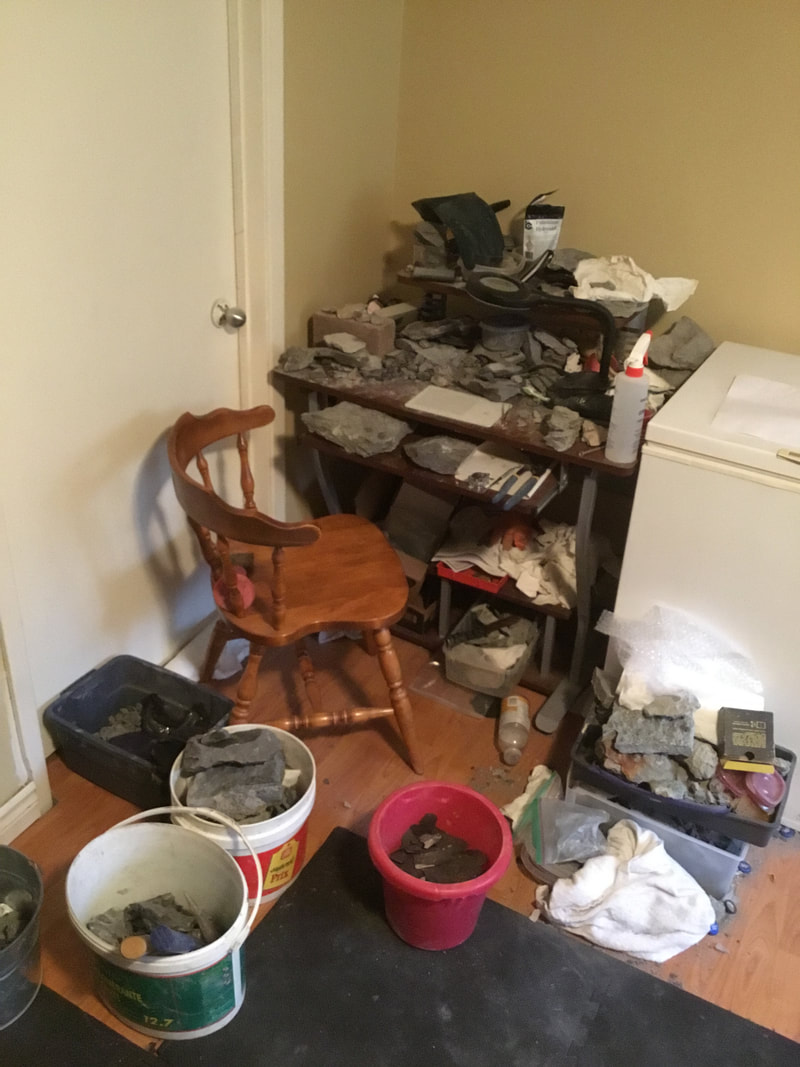 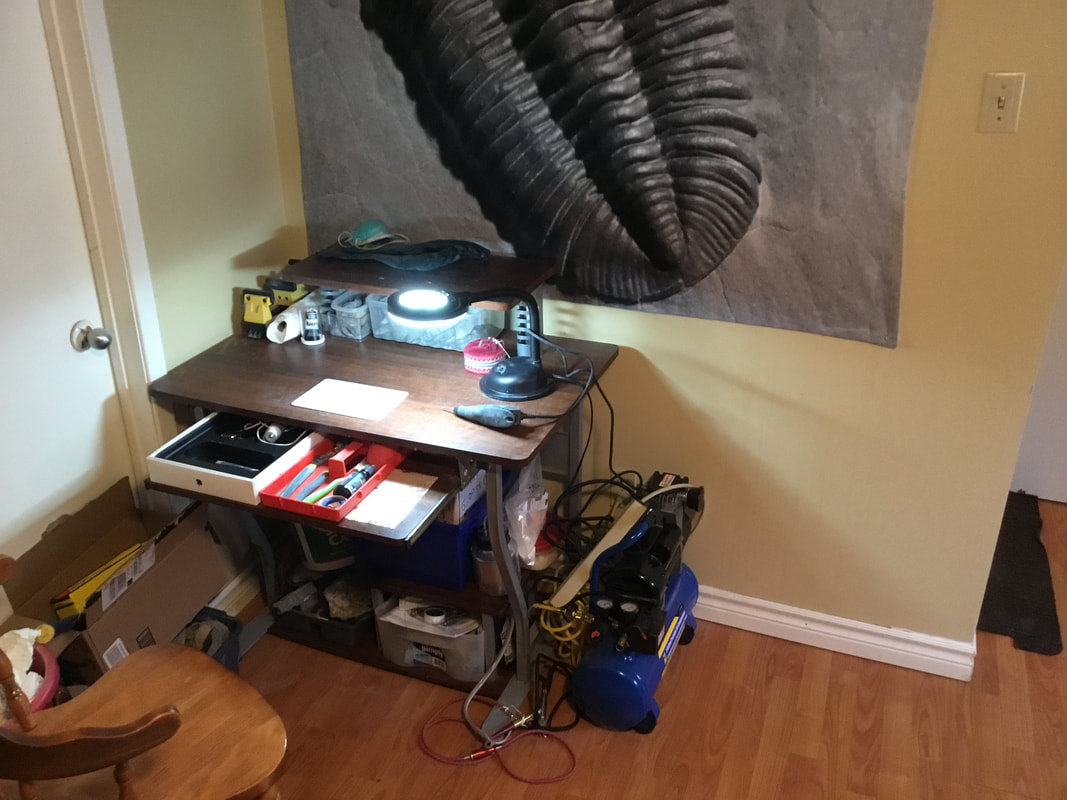 Much neater. There's not terribly lots of space in my house, and the basement is largely dominated by exercise equipment. Still, I did manage to secure this corner of the basement. All I now need to complete the furniture is to get a second working surface to the right of the first one. All the necessary tools are in their rollout drawer or on the top. I'll need to develop a system to place the compressor in a better spot, with holsters for the scribe and abrader. A work in progress, but definitely an improvement! 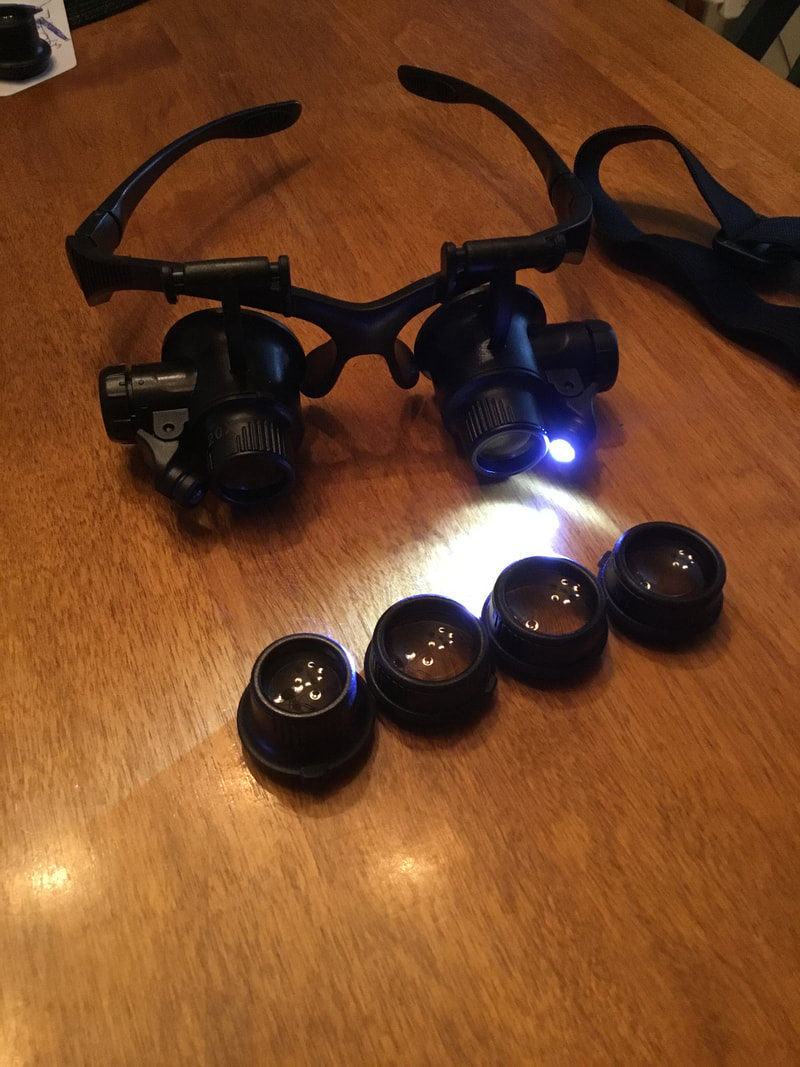 This little toy may make sewing needle based prep a bit easier. The lenses swap out at different magnifications of 10x, 15x, 20x and 25x, and comes with neat side-mounted LED lights. These might actually be very helpful in the field for getting close to the ground and looking for tinier fossils. 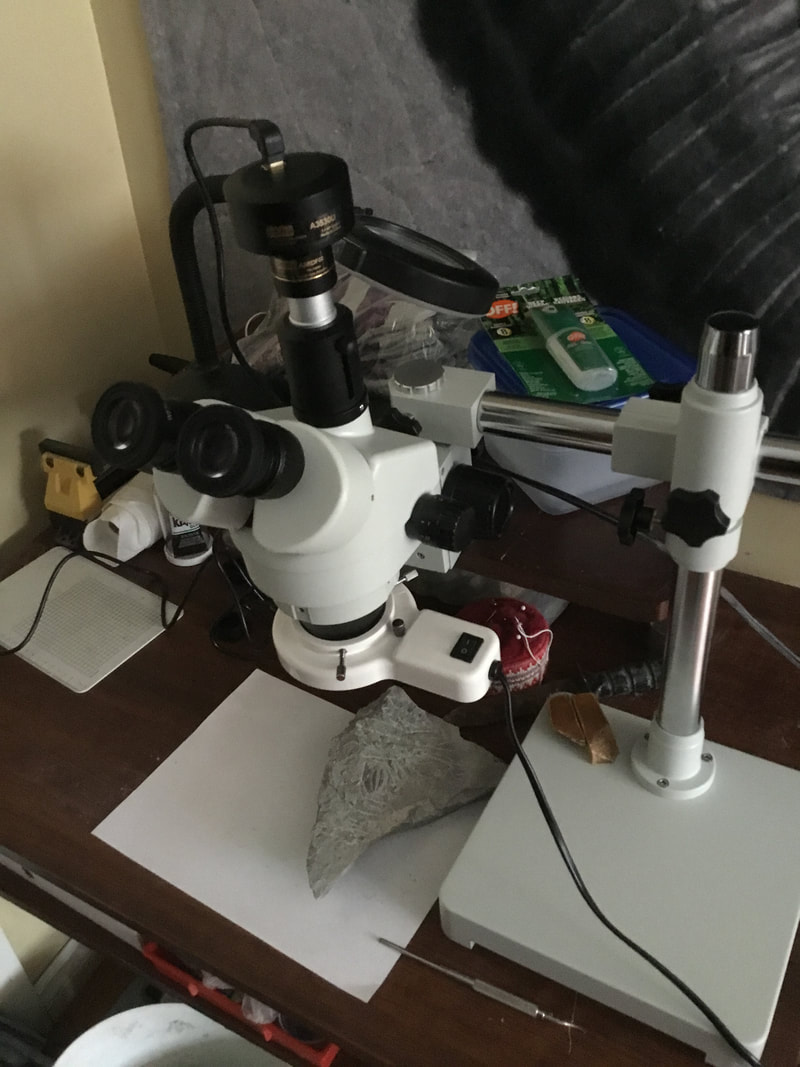 And this arrived the same day as well. An OMAX 3.5x-90x trinocular scope with a USB-fed 3.2 MP camera. It took a ridiculous amount of time to assemble this as it came in a zillion pieces, and the instruction manual that it came with was for an entirely different model (and written in that transliterated Chinese that reads very awkwardly. It comes with 10x and 20x wide-field eye lenses, and a Barlow lens to permit working at a distance - essential once I get a blast box. I went with the adjustable boom as the scope needs to rest on the outside of the blast box glass. Looking through the eye pieces at the right distance takes some getting used to. 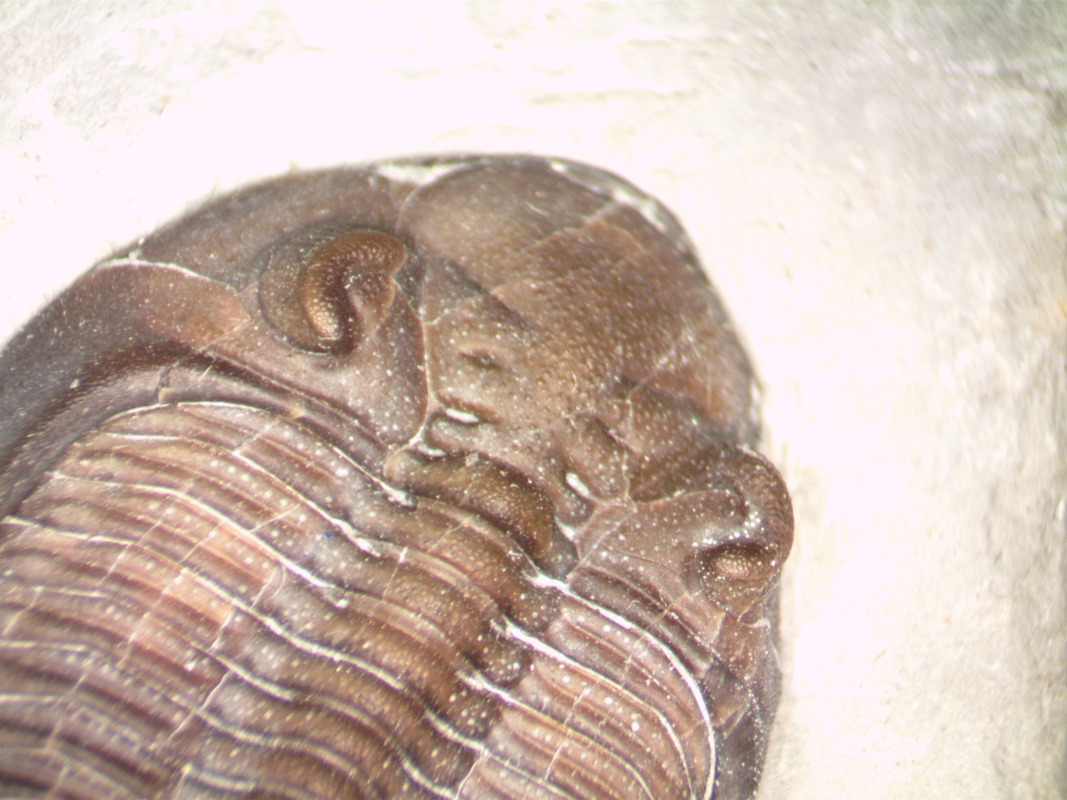 The scope came with camera software, but it was on a CD... and no Apple products come with a CD/DVD drive anymore. It took some sleuthing online to find the software for download. It will take some learning with the software and how to line up the specimens properly for photography. There is a pull-out stop that sends the light up through the camera lens mount, which cuts out light to the left eye piece. What I see through the eye piece is not what shows up on the screen, so some jiggering about is necessary. Pictured here is a fairly nice closeup of a Greenops trilobite that would be about an inch long, of which you can see about a quarter of it here.
This will be very useful for detailed preparation. It would not be useful to get too much closer than 40x-50x for that purpose. All that remains now is to get the blast box, shop vac, and to work on how to vent it outside (maybe through the dryer vent). I anticipate my next blog post here will either be something to do with the fruits of preparation, or in a package of trilobites from Europe from a forum friend - whichever comes first! Hunkering down to keep warm in snowy London, until next time. |
Kane Faucher
Archives
February 2024
|

 RSS Feed